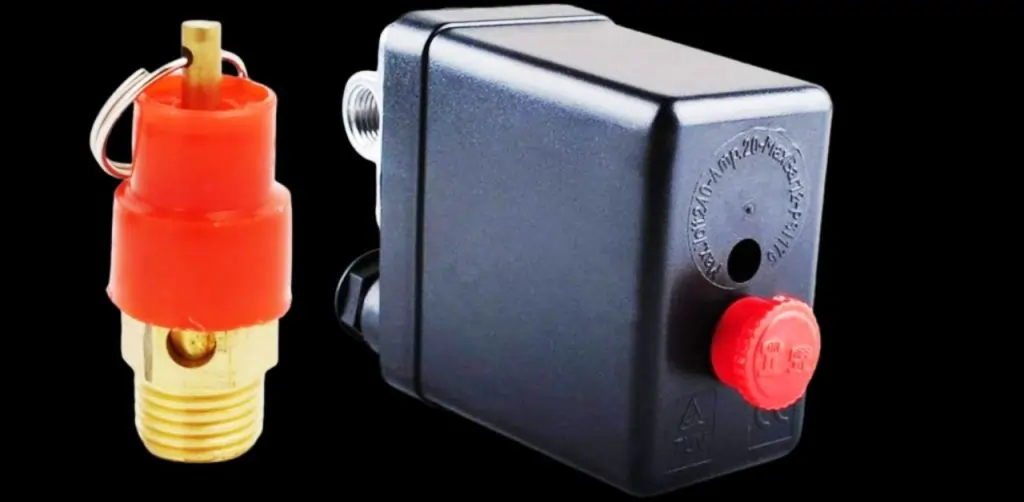
Air Compressor Pressure Switch
Marine air compressors are essential components on ships, playing a crucial role in numerous onboard operations, from starting the main engine to maintaining pneumatic controls and other essential systems. These compressors provide pressurized air that powers a variety of functions, ensuring smooth and efficient ship operation. Given the high-stakes environment at sea, maintaining control and safety in these systems is vital, and this is where the pressure switch becomes indispensable.
The pressure switch in a marine air compressor is responsible for monitoring and regulating air pressure levels, automatically engaging or disengaging the compressor to keep pressure within a safe range. This not only prevents over-pressurization—avoiding damage to equipment and ensuring crew safety—but also enhances operational efficiency by conserving energy and reducing wear on the compressor.
Understanding how the pressure switch works, common troubleshooting techniques, and essential safety tips can help prevent costly breakdowns and ensure that marine air compressor systems perform reliably. In this post, we’ll explore the role of the pressure switch in marine air compressors, how to identify and resolve common issues, and key safety practices to maintain a well-functioning and safe system. Whether you’re a marine engineer or simply interested in the technology…
Components of an Air Compressor Pressure Switch
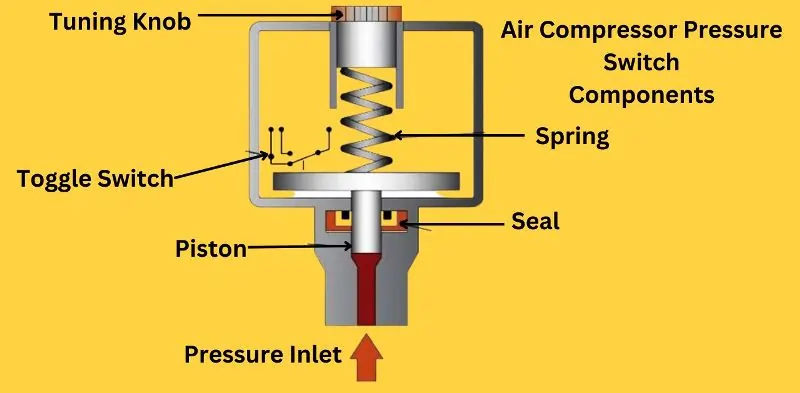
The pressure switch in an air compressor is a critical component, responsible for controlling the compressor’s activation based on pressure levels. The primary parts of a standard air compressor pressure switch are broken down as follows:
1. Turning Knob
The turning knob allows users to adjust the pressure settings of the switch. Users can control when the compressor should start or stop by twisting the knob to set the desired pressure range. Depending on the requirements of the application, this function offers flexibility in pressure regulation.
2. Toggle Switch
The toggle switch is the manual control that powers the compressor on or off. It adds an additional degree of operational ease and security by allowing operators to quickly access and directly manage the system from the outside of the switch housing.
3. Piston
The piston moves in response to pressure changes within the compressor system. As pressure builds up, the piston compresses against the spring, ultimately triggering the switch to turn off the compressor when maximum pressure is reached.
4. Pressure Inlet
The pressure inlet connects the compressor tank to the pressure switch. This inlet allows pressurized air to enter the switch, enabling accurate monitoring of the tank’s internal pressure levels.
5. Seal
The seal prevents air leaks, ensuring that pressure readings remain accurate and that the pressure switch operates efficiently. A well-maintained seal is crucial for optimal performance and longevity of the switch.
6. Spring
The spring inside the pressure switch provides the resistance required for the piston to operate effectively. It compresses as pressure increases, and when pressure decreases, it expands, signaling the switch to activate the compressor again.
Each of these components plays an essential role in ensuring the pressure switch functions correctly, helping maintain consistent air pressure and safe compressor operation.
How Does a Compressor Pressure Switch Work?
The pressure switch in a compressor is a vital component for regulating air pressure within the system, ensuring safe and efficient operation. It operates through a series of precise mechanical and electrical responses to changing pressure levels within the compressor’s air tank. Here’s a step-by-step explanation of how it functions:
- Air Pressure Monitoring
The pressure switch is connected to the compressor’s air lines, which carry pressurized air to and from the tank. As air pressure within the tank increases, it acts on a diaphragm inside the switch. - Diaphragm Compression and Cut-Out Pressure
When exposed to rising air pressure, the diaphragm begins to compress. This compression creates a buildup of force known as the cut-out pressure. As the diaphragm deforms under this pressure, it triggers the internal mechanisms of the switch, causing the circuit to break and cutting off power to the compressor motor. This stops the compressor from further pressurizing the tank. - Maintaining Open Position Under High Pressure
While air pressure remains high, the diaphragm stays deformed, holding the switch open and preventing the compressor from starting again. However, as air is used and pressure drops, the diaphragm eventually returns to its original position. - Reverting at Cut-In Pressure
When pressure falls to a set cut-in pressure threshold, the diaphragm reverts, closing the switch circuit. This allows power to flow to the compressor, restarting the cycle.
This cycle repeats as long as the compressor operates, automatically adjusting to maintain safe pressure levels. However, leaks in the system can interfere with this process, leading to potential operational issues and safety hazards if left unchecked.
How to Adjust the Compressor Pressure Switch: A Step-by-Step Guide
Adjusting your compressor’s pressure switch settings is essential for ensuring efficient operation and maintaining safe pressure levels. Here’s a step-by-step guide to setting the cut-in and cut-out pressures, locating and using adjustment screws, testing the settings, and avoiding common mistakes.
Steps to Adjust Pressure Settings
1. Setting the Cut-In Pressure
- Determine the Current Cut-In Pressure
Start with an empty compressor tank. Let the compressor run until it reaches the cut-out pressure and stops. Open the pressure relief valve to lower the tank pressure, watching the pressure gauge as it falls. When the compressor restarts, note this pressure level—this is the current cut-in setting. - Using the Adjustment Screws
Locate the larger set screw on the pressure switch. Turn it clockwise to increase or anticlockwise to decrease the cut-in pressure. After each adjustment, close the relief valve and let the compressor reach the cut-out level. Repeat if needed to reach the desired cut-in pressure.
2. Setting the Cut-Out Pressure
- Adjust the Cut-Out Pressure
If your switch has a second, smaller screw, use it to adjust the cut-out pressure (the pressure at which the compressor stops). Clockwise turns increase the cut-out pressure, while anticlockwise turns reduce it. If your switch doesn’t have a second screw, only the cut-in pressure can be adjusted.
Testing the Settings
After adjusting both pressures, test the compressor’s operation to ensure it starts and stops at the intended pressures. This verification helps confirm safe and efficient operation.
Common Mistakes to Avoid
- Over-Tightening Adjustment Screws: Tightening too much can damage the screws and switch mechanism.
- Skipping the Testing Step: Always test after adjustments to avoid pressure issues.
- Misidentifying Screws: Ensure you’re turning the correct screw for each setting—typically the larger one for cut-in, and the smaller for cut-out if available.
By following these steps, you’ll safely and accurately adjust your compressor pressure switch for reliable performance.
How to Handle a Leak in the Air Compressor Pressure Switch
A leak in your air compressor pressure switch can affect performance, waste energy, and pose safety risks. Here’s a guide on identifying and addressing pressure switch leaks effectively.
Identifying the Leak Source
- Inspect the Pressure Switch
First, disconnect the compressor from the power source and turn it off. Carefully examine the pressure switch for any visible signs of leaking air, listening for hissing sounds or feeling for escaping air around connections, seals, and the switch itself. - Check for Common Leak Points
Pay close attention to fittings, the diaphragm, and connections to ensure that air isn’t escaping from any of these areas. Use soapy water if needed—bubbles will appear at the leak source when air escapes.
Common Causes of Pressure Switch Leaks
- Wear and Tear
Over time, components like the diaphragm and seals can deteriorate, leading to air leaks. - Loose Fittings
Vibrations and regular use can cause fittings to loosen, especially where the switch connects to the air tank or other components. - Faulty Diaphragm
The diaphragm can weaken or rupture, which is a common cause of persistent leaks.
Temporary Fixes and When to Replace
- Tighten Fittings
For minor leaks due to loose fittings, try tightening them carefully with a wrench. - Apply Sealant
A temporary sealant can help for small leaks around threaded connections, but it’s best to address underlying issues quickly. - Consider Replacement
If the diaphragm or internal parts are damaged, it’s safer and more cost-effective to replace the pressure switch entirely.
Safety Precautions
- Disconnect Power
Always unplug the compressor before inspection or repairs to avoid electrical hazards. - Release Air Pressure
Relieve all stored air pressure in the tank to prevent accidental discharge.
By following these steps, you can locate, assess, and address pressure switch leaks safely, keeping your compressor operating efficiently.
Replacement of the Air Compressor Pressure Switch
Replacing an air compressor pressure switch is essential when wear, leaks, or malfunctions compromise performance and safety. Here’s how to determine when a replacement is needed, choose the right switch, and install it effectively.
Signs You Need a Replacement
- Inconsistent Pressure Readings
If your compressor struggles to maintain consistent pressure or frequently stops and starts at incorrect pressure levels, the pressure switch may be faulty. - Repeated Leaks
Persistent air leaks around the pressure switch, despite attempts to fix them, often indicate that the switch components, like seals or diaphragms, have degraded and need replacement. - Failure to Start or Stop
If the compressor doesn’t start or stop when reaching cut-in or cut-out pressures, the switch may no longer be functioning correctly and should be replaced.
Choosing the Right Replacement
Select a compatible pressure switch based on your air compressor’s make and model. Ensure the new switch matches the required cut-in and cut-out pressure settings and voltage to avoid operational issues.
Step-by-Step Replacement Guide
- Power Down and Release Pressure
Unplug the compressor and release air pressure by opening the relief valve to ensure safety during the replacement process. - Disconnect the Old Pressure Switch
Use a wrench to carefully loosen and remove the pressure switch connections, noting the configuration for accurate reconnection. - Install the New Pressure Switch
Attach the new pressure switch by connecting it securely to the tank and reattaching all fittings and wiring according to the manufacturer’s instructions. Tighten any loose connections to prevent leaks. - Secure the Switch
Make sure the switch is fastened properly, with no exposed wiring or loose connections.
Post-Replacement Testing
After installation, test the new switch by allowing the compressor to reach both cut-in and cut-out pressures. Monitor for any leaks or irregular operation to confirm the switch functions as expected. Adjust settings if needed and check the system thoroughly to ensure consistent pressure regulation.
By following these steps, you’ll ensure your air compressor operates reliably and safely with the new pressure switch.
FAQ: Air Compressor Pressure Switch
Q. How does a compressor pressure switch work?
A. The diaphragm pushes open the contacts at the set pressure, stopping the motor and releasing back-pressure.
Q. What is the working principle of a pressure switch?
A. The diaphragm compresses a spring, opening or closing the contacts when pressure reaches the set point.
Q. How can I increase my air compressor pressure?
A. Turn the adjustment screw clockwise to increase pressure.
Q. How do I test a compressor pressure switch?
A. Use a multimeter to check for continuity in the switch.
Conclusion
In conclusion, the air compressor pressure switch plays a crucial role in maintaining the safety, efficiency, and longevity of your compressor system. Understanding its function, knowing how to adjust the pressure settings, and being able to identify and fix issues like leaks or malfunctioning switches are essential skills for anyone operating an air compressor. By following the guidelines provided in this post, you can ensure that your pressure switch operates smoothly and reliably, helping to prevent costly repairs and improve overall performance. Always prioritize safety during maintenance, and don’t hesitate to replace the switch if necessary. With the right knowledge and regular upkeep, your air compressor will continue to function at its best for years to come.